Faster Builds with Module Federation
As applications grow, builds can become unacceptably slow, which leads to slow CI/CD pipelines and long dev-server startup times. This slowness decrease team productivity due to long waits for local compilation, and clogged up CI/CD pipelines.
Module Federation provides a solution to the scaling problem by allowing a Single Page Application (SPA) to be sliced into multiple smaller remote applications that are built independently. There are some costs to slicing an application through Module Federation:
- Cognitive overhead of developing multiple applications versus a SPA.
- Coordinating build and deployment across many applications is a huge headache, especially in a multi-repo setup.
- Version-Mismatch-Hell where different applications are deployed with different versions of shared libraries can lead to unexpected errors.
Nx provides the best experience for teams that want faster builds, but want to also minimize the downsides that come with Module Federation. Starting in Nx 14, we provide specialized generators, executors, and utilities that make Module Federation easy to set up and work with.
When should I use Module Federation?
Whether Module Federation makes sense for your team depends on the size of your application. Although Nx hides most of the complexity around Module Federation, it still comes with some downsides:
- Developers need to think about which remotes they are working on, since it is a waste of CPU and memory to run all remotes in development mode. In practice this may not be a problem if the teams are already divided by domain or feature.
- Increased orchestration since remotes are independent of each other, shared state may require the host application to coordinate it between remotes. For example, sharing Redux state across remotes is more complicated versus a SPA.
Architectural overview
With Module Federation, a large application is split into:
- A single Host application that references external...
- Remote applications, which handle a single domain or feature.
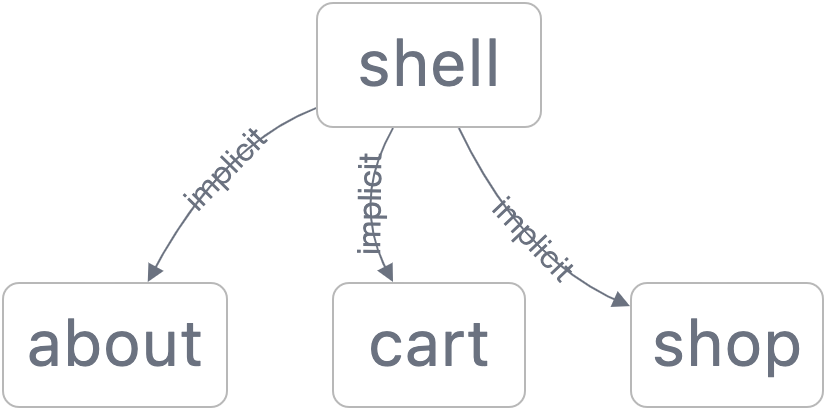
In the next section, we will see an example with a host app (shell) and three remotes (shop, cart, about). Although all the applications are independently built, thus have no dependency between them, conceptually you can think of them in the following hierarchy.
Creating an example workspace
The best way to understand the setup is through an example. In this section, we will create a shell (host) application with three remotes under these routes:
/shop/cart/about
First, create an empty Nx workspace.
# Replace acme with desired scope
npx create-nx-workspace acme --preset=empty
cd acme
Note: You will be prompted to enable Nx Cloud in the workspace. For the best experience, we highly recommend using Nx Cloud to take advantage of distributed caching and other features it provides. We'll discuss this later in the guide.
Then, for React users, install the @nrwl/react plugin; and for Angular users, install the @nrwl/angular plugin.
# If you use React
npm install --save-dev @nrwl/react

# If you use Angular
npm install --save-dev @nrwl/angular

# Or with yarn
yarn add --dev @nrwl/react
yarn add --dev @nrwl/angular
Next, generate the host and remote applications.
# React
nx g @nrwl/react:host shell --remotes=shop,cart,about

#a Angular
nx g @nrwl/angular:host shell --remotes=shop,cart,about
Note: You can leave off the --remotes option and add them later with nx g @nrwl/react:remote shop --host=shell or nx g @nrwl/angular:remote shop --host=shell.
Now, serve shell to view it in your browser.
nx serve shell --openThe above command serves shell in development mode, whereas the remotes are built and served statically. That is, changes to shell will update its bundle, but changes to remotes will not update.
To run one or more remotes in development mode, use the --devRemotes option.
nx serve shell --open --devRemotes=shop,cartThe above command starts the shop and cart remotes in development mode, but about will remain static.
What was generated?
To understand how Module Federation works with Nx, let's take a look at three files that control this feature.
apps/shell/project.json
The build target uses @nrwl/web:webpack for React, and @nrwl/angular:webpack-browser for Angular. This is the same as a normal SPA that uses custom webpack configuration (webpackConfig), but difference is in the webpack configuration file.
We also encourage you do create implicit dependencies between the host to all the remotes it references. This has a benefit when building the host, and also allows distributed task execution to work. To create these dependencies, add the implicitDependencies configuration.
// apps/shell/project.json
{
  //...
  "implicitDependencies": ["about", "shop", "cart"]
}
In the future, Nx may automatically handle this for you.
apps/shell/webpack.config.js
The webpack configuration uses an utility function that Nx provides: withModuleFederation.
1// For Angular, you'll see `@nrwl/angular/module-federation`
2const withModuleFederation = require('@nrwl/react/module-federation');
3const moduleFederationConfig = require('./module-federation.config');
4
5module.exports = withModuleFederation({
6  ...moduleFederationConfig,
7});
We'll talk about what withModuleFederation does in a bit, but for now the important part of the configuration is the use of module-federation.config.js which we will examine next.
apps/shell/module-federation.config.js
This file is the main configuration for the shell, and you'll see module-federation.config.js for the generated remotes as well.
1module.exports = {
2  name: 'shell',
3  remotes: ['shop', 'cart', 'about'],
4};
The required name property is the magic to link the host and remotes together. Since shell is a host, it references the three remotes by their names.
Note: It is important that the values in remotes property matches the name property of the remote applications. Otherwise, webpack will throw an error. Nx handles this automatically for you so there shouldn't be an issue unless it was modified manually.
What does withModuleFederation do?
In the previous section, we saw withModuleFederation used in the webpack config. This function is an abstraction on top of webpack's ModuleFederationPlugin with some Nx-specific behavior.
- All libraries (npm and workspace) are shared singletons by default, so you don't manually configure them.
- Remotes are referenced by name only, since Nx knows which ports each remote is running on (in development mode).
With Nx, the developer experience (DX) when working with Module Federation matches more closely to development on a SPA. You don't have to worry about managing a bunch of configuration, and most things just work out of the box.
Overriding shared library config
If you want to opt-out of the shared, singleton behavior of libraries you can use the shared: (libraryName, sharedConfig) => sharedConfig) option in module-federation.config.js.
1module.exports = {
2  name: 'shell',
3  remotes: ['shop', 'cart', 'about'],
4  shared: (name, config) => {
5    if (name === 'react' || name === 'react-dom') {
6      // If you want to relax strictness
7      return { ...config, strictVersion: false };
8    }
9  },
10};
The shared function can return a shared config that webpack supports, undefined to use Nx's default value, or false to exclude it from being shared.
Note: We discourage users from overriding the shared configuration. If you have any feedback regarding this feature, we'd love to hear from you--check our community page for links to our Slack and Twitter.
Distributed caching with Nx Cloud
Module Federation works best when Nx Cloud is enabled in the workspace. If you haven't enabled it yet when using create-nx-workspace, you can do the following.
# Install the package
npm install --save-dev @nrwl/nx-cloud
# Or through yarn
yarn add --dev @nrwl/nx-cloud

# Then enable cloud in the workspace
nx g @nrwl/nx-cloud:init
With Nx Cloud enabled, a large set of builds can be skipped entirely when running the application locally (and in CI/CD). When you run builds through Nx + Nx Cloud, the artifacts are stored in the distributed cache, so as long as the source hasn't changed, the application can be served from cache.
You can see this behavior locally if you serve the shell twice.
nx serve shell

# (kill server)

nx serve shell
The second serve should start up much faster, because the three remotes (shop, cart, about) are read from cache. Not only that, any other copy of the workspace will also benefit from the cache if they are on the same branch as you are.
If you inspect the terminal output, you'll see something like this, even if you are on different machines.
> nx run about:build:development  [existing outputs match the cache, left as is]

 (snip)

 >  NX   Successfully ran target build for project about

   Nx read the output from the cache instead of running the command for 1 out of 1 tasks.
This caching behavior is crucial for things like end-to-end (E2E) testing because testing against a static server is much more efficient than starting many servers in development mode. When the CI pipeline runs E2E tests, it should be be reading from caching, since you've already run the server locally.
Production build and deployment
In this section, we'll examine how to set up your production build and simulate a deployment to http://localhost:3000.
In order to make building and deploying easier, we recommend adding implicit dependencies from shell to each remote. In case you didn't already set this up, add the following line to the shell's project configuration.
// apps/shell/project.json
{
  //...
  "implicitDependencies": ["about", "shop", "cart"]
}
Next, open up the production webpack configuration file and update the remote URLs to their own subfolder under http://localhost:3000.
1// apps/shell/webpack.config.prod.js
2const withModuleFederation = require('@nrwl/react/module-federation');
3const moduleFederationConfig = require('./module-federation.config');
4
5module.exports = withModuleFederation({
6  ...moduleFederationConfig,
7  remotes: [
8    ['shop', 'http://localhost:3000/shop'],
9    ['cart', 'http://localhost:3000/cart'],
10    ['about', 'http://localhost:3000/about'],
11  ],
12});
Now you can run nx build shell to build all the shell and all the implicit dependencies in production mode. Again, if you have Nx Cloud enabled then the build artifact will be in the distributed cache for other developers and CI/CD to read from.
After running that command you'll see the following artifacts in dist folder.
dist/apps
├── about
├── cart
├── shell
└── shop
Now, we can add a simple deploy command to simulate deploying this folder to production.
nx g @nrwl/workspace:run-commands \
deploy \
--project=shell \
--command="rm -rf production && mkdir production && cp -r dist/apps/shell/* production && cp -r dist/apps/{shop,cart,about} production && http-server -p 3000 -a localhost production"
You can then run nx deploy shell to see the application running on http://localhost:3000. If you inspect the production folder you'll see the following files.
production/
├── about
│   ├── remoteEntry.js
│   └── (snip)
├── cart
│   ├── remoteEntry.js
│   └── (snip)
├── shop
│   ├── remoteEntry.js
│   └── (snip)
├── index.html
└── (snip)
The above command is just an example. You'll need to use what make sense for your team and workspace.